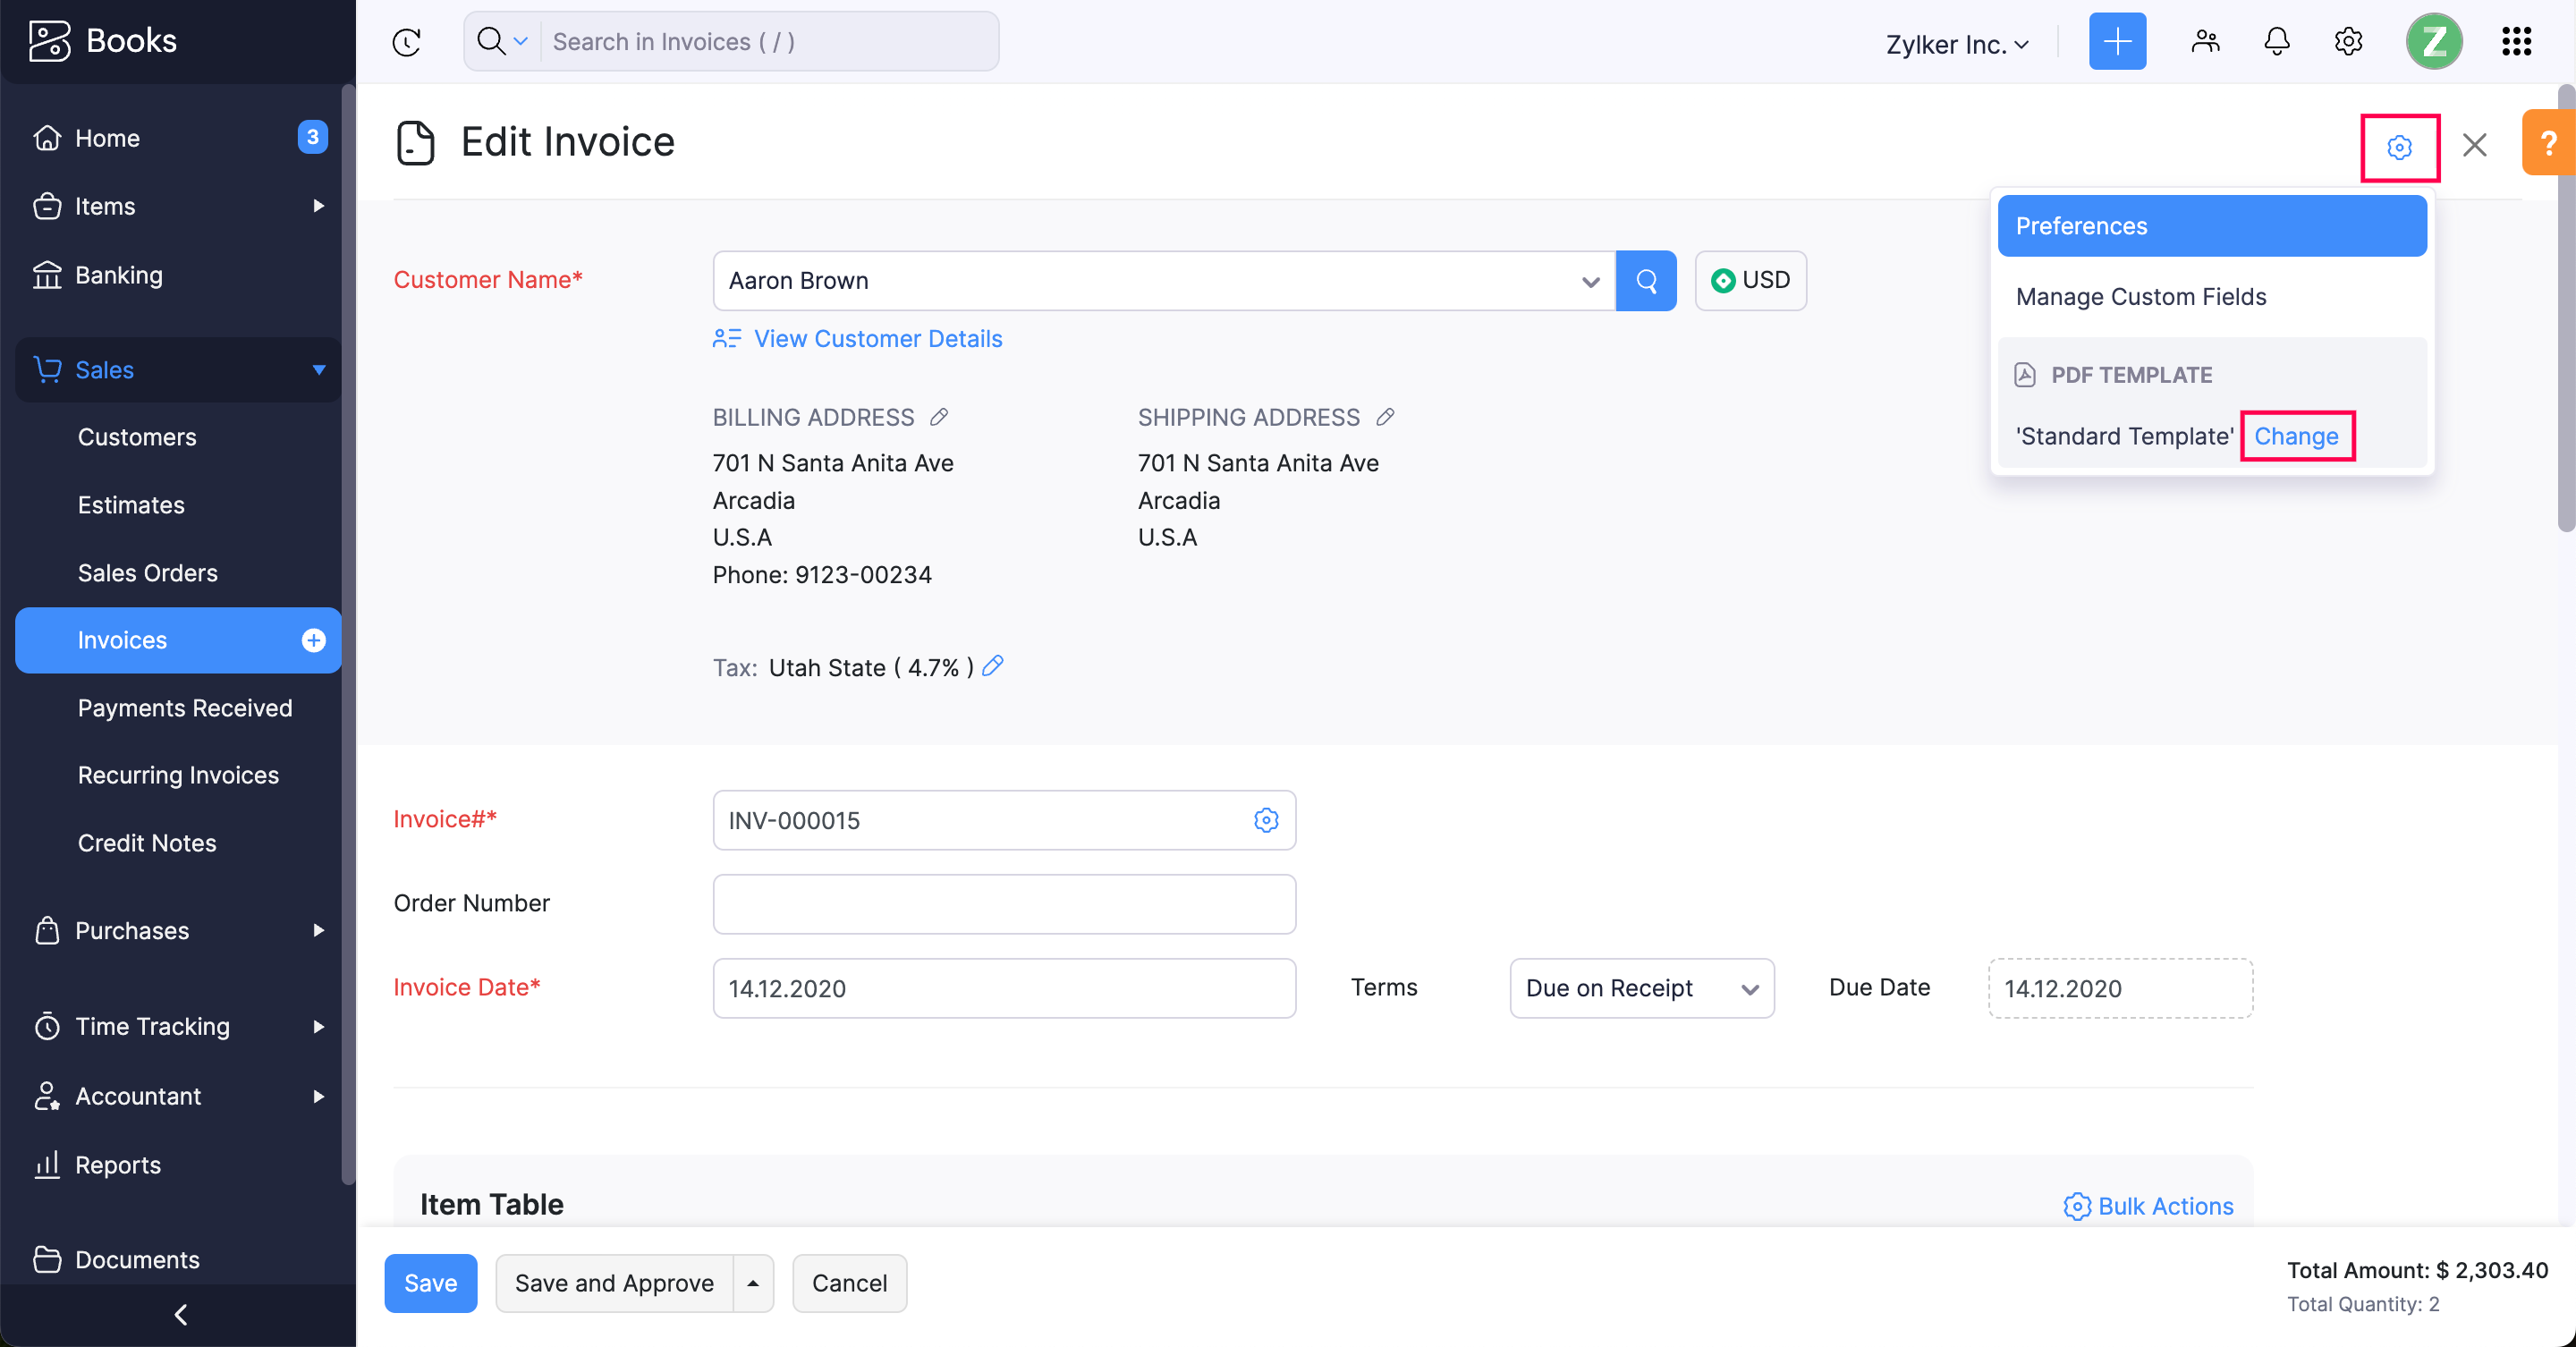
Changing the invoice template in Zoho Books is simple. It enhances your brand’s image.
In today’s business world, professional invoicing matters. Zoho Books offers customizable invoice templates that match your brand’s style. You can change these templates to fit your needs. This guide will help you through the process step-by-step. No technical skills required.
Boost your invoicing game with a few clicks. Ready to make your invoices stand out? Let’s dive in and learn how to change your invoice template in Zoho Books.
Credit: www.zoho.com
Accessing Invoice Templates
Changing your invoice template in Zoho Books can give your business a professional look and feel. It’s a quick way to refresh your brand and ensure your invoices stand out. If you’re unsure how to access and change your invoice templates, don’t worry! This guide will walk you through the process step-by-step.
Navigating To Templates Section
First things first, you need to know where to find the invoice templates in Zoho Books. It’s easier than you might think! Follow these simple steps:
- Log into your Zoho Books account.
- From the left sidebar, select Settings.
- In the drop-down menu, click on Templates.
- Choose Invoices from the list of available templates.
And voilà, you’re now in the templates section! It’s a bit like finding a hidden treasure, isn’t it?
Understanding Template Options
Once you’re in the templates section, you’ll see a variety of options. Zoho Books offers several pre-designed templates, each catering to different business needs. Here’s how you can make sense of them:
- Classic: A simple, clean design that’s perfect for businesses who prefer a traditional look.
- Modern: Sleek and stylish, ideal for tech-savvy companies.
- Minimalist: For those who believe less is more. It’s all about simplicity.
- Custom: Tailor-made for your business. You can tweak everything to your liking.
Choosing the right template can set the tone for your business. Are you more classic or modern? Do you like things simple? Or maybe you want something unique? The choice is yours.
Changing your invoice template in Zoho Books is a straightforward process. By following these steps, you can quickly navigate to the templates section and choose the one that best fits your business’s personality. Remember, the right template not only enhances your brand but also makes a lasting impression on your clients.

Credit: www.youtube.com
Choosing A Pre-designed Template
Choosing a pre-designed template in Zoho Books simplifies the invoicing process. These templates provide a professional look without the need for design skills. Explore the available templates to find the one that suits your business style.
Exploring Available Templates
Zoho Books offers a variety of pre-designed templates. Each template caters to different business needs. You can find templates that match your brand’s aesthetics. Browse through the collection to see all the options.
Previewing Templates
Previewing templates helps you see the layout before applying it. Click on a template to view its full design. This step ensures the template meets your requirements. Make sure the template aligns with your brand’s image.
Customizing The Chosen Template
When you choose an invoice template in Zoho Books, the next step is customizing it to suit your business needs. This process is crucial for creating a professional and branded look that impresses your clients. In this section, we will guide you through the steps of Customizing the Chosen Template. Let’s make your invoices stand out!
Modifying Layout And Design
First, consider the layout and design of your invoice. Zoho Books offers various options to change the look and feel. Here’s how you can modify it:
- Go to the Settings menu and select Templates.
- Choose the template you want to customize and click Edit.
- Use the tools available to adjust the layout. You can move sections around, change fonts, and alter colors. A clean, well-organized layout makes it easier for your clients to understand the invoice.
Think of it like decorating a room. You want everything to be in the right place and pleasing to the eye. A well-designed invoice can make a big difference.
Adding Company Logo And Branding
Your company logo and branding are vital parts of your invoice. They help to create a professional image and build brand recognition. Here’s how to add these elements:
- Upload Your Logo: In the template editor, find the option to upload your company logo. Make sure the logo is clear and high-quality.
- Brand Colors: Use your brand’s colors in the invoice design. This can include the header, footer, and even the text. Consistency in branding helps in making your invoices recognizable.
- Contact Information: Add your company’s contact details. This should include your address, phone number, and email. It helps clients know how to reach you.
Imagine receiving an invoice that looks like it was made just for you. That’s the impression you want to give your clients with your customized invoice.
| Feature | Why It’s Important |
|---|---|
| Logo | Creates a professional look and builds brand identity. |
| Brand Colors | Makes the invoice visually appealing and consistent with your brand. |
| Contact Information | Provides clients with essential information to contact you. |
Customizing your invoice template in Zoho Books is like putting your personal stamp on your business. It shows that you care about details and professionalism. Plus, it makes your invoices more memorable. So, go ahead, make those changes and watch how they elevate your business image!

Credit: www.youtube.com
Editing Invoice Fields
Editing invoice fields in Zoho Books can seem a bit daunting at first, but with a little guidance, you’ll find it’s quite straightforward. Customizing these fields allows you to tailor your invoices to better suit your business needs. Let’s walk through the process of editing these fields and making your invoices look just the way you want them.
Customizing Field Labels
One of the key aspects of editing invoice fields is customizing field labels. You might want to change the default labels to match your business terminology or simply to make them more understandable for your clients. Here’s how you can do it:
- Navigate to the Settings tab in Zoho Books.
- Select Templates, and then choose Invoices.
- Click on the Edit button next to the invoice template you wish to modify.
- Click on the Fields tab. Here, you can see a list of all the fields available in the invoice.
- Click on the field label you want to change, and type in the new label.
For example, you might change “Item” to “Product” or “Service” to better reflect what you are invoicing for. This simple adjustment can make a big difference in how your clients perceive your invoices.
Rearranging Field Order
Another way to customize your invoice template is by rearranging the field order. This can help you prioritize certain information, making your invoices clearer and more organized. Here’s how to go about it:
- Go back to the Fields tab within the invoice template editor.
- Click and hold the drag icon next to the field you want to move.
- Drag the field to its new position and release the mouse button to drop it.
For instance, if you want the Due Date to appear right below the Invoice Date, simply drag it to the desired spot. This makes crucial information more accessible to your clients, which can help in avoiding payment delays.
Making these adjustments in Zoho Books not only personalizes your invoices but also enhances readability and professionalism. Remember, the easier your invoices are to understand, the quicker your clients can process them. So, take a few minutes to tweak these settings and see how it transforms your billing process!
Incorporating Payment Terms
Incorporating payment terms into your invoice template in Zoho Books can help ensure timely payments. Clear payment terms can prevent confusion and disputes. Here, we will discuss how to set payment due dates and add late fee policies to your invoice template.
Setting Payment Due Dates
Payment due dates help specify when you expect to receive payment. In Zoho Books, you can easily set these dates. Go to the invoice template settings. Find the section for payment terms. Here, you can set the due date as per your business policy. You can choose terms like “Net 30” or “Due on Receipt”. This makes it clear to clients when they need to pay.
Adding Late Fee Policies
Late fee policies can encourage timely payments. In Zoho Books, you can add these policies to your invoice template. Go to the invoice template settings. Look for the late fee section. Here, you can define the late fee terms. Specify the fee amount or percentage. Mention when the late fee applies. This can help reduce late payments and improve cash flow.
Including Tax Information
Setting up your invoice template in Zoho Books is quite straightforward. However, including tax information might seem a bit tricky at first. But don’t worry, I’ll guide you through it step-by-step. Adding tax rates and displaying tax details on your invoices not only keeps you compliant with local regulations but also provides clarity to your clients.
Adding Tax Rates
First things first, let’s talk about adding tax rates. It’s like adding seasoning to a dish – you need the right amount to make it perfect.
- Login to Zoho Books: Start by logging into your Zoho Books account.
- Navigate to Settings: Go to the Settings tab on the left sidebar.
- Find Taxes: Under Settings, select Taxes.
- Add a New Tax: Click on the + New Tax button. Here, you can specify the tax name, rate, and description.
- Save: Once you’ve filled in the details, click Save.
And voila! You’ve added a new tax rate. Easy as pie, right?
Displaying Tax Details On Invoices
Now that we have our tax rates set up, it’s time to display them on your invoices. This part is crucial because it ensures transparency and accuracy in your billing.
- Choose an Invoice Template: Head over to the Templates section under Settings and pick the invoice template you want to customize.
- Edit Template: Click on Edit next to your chosen template.
- Customize: In the customization window, make sure to include a section for tax details. You can add fields for tax rates, tax amounts, and total tax.
- Preview and Save: Before saving, preview your invoice to ensure everything looks perfect. Once satisfied, hit Save.
And there you have it! Your invoices will now display tax details clearly, ensuring your clients have all the information they need.
Changing the invoice template in Zoho Books to include tax information might seem daunting at first. But with these simple steps, you’ll master it in no time. Remember, it’s all about ensuring accuracy and transparency in your billing process. Happy invoicing!
Saving And Applying The Template
Congratulations! You’ve customized your invoice template in Zoho Books. Now, let’s focus on saving and applying this template to your invoices. This step ensures your hard work pays off and your invoices look just the way you want them to. The process is straightforward and quick. Ready to dive in?
Saving The Customized Template
First things first, you need to save your customized template. Here’s how you do it:
- After making your changes, look for the Save button, usually found at the bottom or top right corner of the page.
- Click on Save. A prompt may appear asking you to name your template. Choose a name that’s easy to remember.
- Once saved, your template will be stored in the Templates section of Zoho Books.
Easy-peasy, right? Now, let’s move on to applying this template to your invoices.
Applying Template To Invoices
With your template saved, applying it to invoices is a breeze. Here’s the step-by-step guide:
- Navigate to the Invoices section in Zoho Books.
- Click on Create New Invoice or open an existing invoice that you want to apply the template to.
- In the invoice editor, you’ll see an option to select the template. This might be labeled as Template, Design, or something similar.
- Select your customized template from the dropdown menu.
- Review the invoice to ensure everything looks perfect.
- Save or send the invoice to your client.
Voilà! Your invoice now sports your personalized template. It’s that simple.
Remember, a well-designed invoice not only makes a good impression but can also streamline your billing process. So, take a moment to ensure everything looks just right.
Do you have any funny stories about using templates? Maybe a time you accidentally sent an invoice with a quirky design to a client? Share in the comments below!
Testing The New Template
Testing your new invoice template in Zoho Books is essential. It ensures everything appears correctly before sending it to clients. This process helps catch errors and make final adjustments.
Creating A Test Invoice
First, create a test invoice in Zoho Books. Open the ‘Invoices’ section and click ‘New Invoice.’ Fill in the required details. Choose a client, add items, and set prices. Select the new template from the template dropdown menu.
Save the invoice as a draft. This way, you can review it without sending it. Open the draft invoice to view it in your new template.
Reviewing Final Output
Carefully review the test invoice. Check for alignment issues, font sizes, and colors. Ensure all information is clear and accurate. Verify that your logo appears correctly.
Look at the invoice on different devices. Check it on both desktop and mobile. Make sure it looks good everywhere. Pay attention to margins and spacing.
If you find any issues, go back and edit the template. Repeat the test until everything is perfect. Once satisfied, your new template is ready for use.
Troubleshooting Common Issues
Changing your invoice template in Zoho Books can sometimes lead to unexpected issues. Don’t worry, though! We’ve got your back. This section will walk you through fixing common problems, ensuring your invoices look professional and meet standards. Let’s dive in!
Fixing Formatting Errors
Formatting errors can be frustrating, but they’re usually easy to fix. Here are some common issues and their solutions:
- Text Overlapping: Ensure that the text boxes have enough space. Adjust the font size or box dimensions.
- Misaligned Elements: Use the alignment tools in Zoho Books to straighten out any crooked elements.
- Image Distortion: Check the image size. It should be proportionate to avoid stretching or compression.
For instance, I once had a logo that looked more like a squished bug than a professional emblem. A quick resize fixed that in no time!
Ensuring Compliance With Standards
It’s important to ensure your invoices meet certain standards and regulations. Here’s how you can do this:
- Include all necessary details such as business name, contact information, and tax identification number.
- Ensure the invoice number is unique and follows a logical sequence.
- Clearly state the payment terms and due date.
- Double-check for any mandatory fields required by your local tax authority.
Have you ever received a confusing bill with missing information? It’s not a pleasant experience. By adhering to these standards, you can avoid such mishaps for your clients.
If you still face issues, don’t hesitate to reach out to Zoho’s support team. They’re quite helpful and can guide you through any hiccups you might encounter.
Remember, a well-formatted and compliant invoice not only reflects professionalism but also ensures smooth transactions. Happy invoicing!
Frequently Asked Questions
How Do I Change The Template In Zoho?
To change the template in Zoho, go to the “Settings” menu, select “Templates,” and choose your desired template. Save changes.
How Do I Change The Format Of An Invoice?
To change the format of an invoice, go to your invoicing software settings. Select the template or layout options. Customize fields, fonts, and colors as needed. Save the changes and preview the invoice. Ensure it meets your requirements before using it for transactions.
How Do I Change The Template On My Invoice Home?
To change the template on Invoice Home, log in, select “Settings,” choose “Template,” and pick your preferred design. Save changes.
How To Set Default Template In Zoho Books?
To set a default template in Zoho Books, go to Settings > Templates. Select the template you want and click “Set as Default”.
How Can I Customize My Invoice Template In Zoho Books?
To customize your invoice template in Zoho Books, go to Settings, then Templates. Select Invoices, and choose Customize.
Conclusion
Changing your invoice template in Zoho Books is simple. Follow the steps. Customize it to fit your brand. Make your invoices look professional. Impress clients with a polished look. Save time with automation. Enhance your business efficiency. Keep records organized and easily accessible.
Enjoy seamless invoicing with Zoho Books. Your business deserves the best. Implement these changes now. Make your invoicing process smooth and effective.