Adding inventory in Zoho Books helps manage your stock efficiently. It keeps your business organized and makes tracking easy.
Zoho Books is a popular accounting software. It offers many tools to streamline business operations. One crucial feature is inventory management. Proper inventory tracking can save time and reduce errors. In this guide, we’ll explain how to add inventory in Zoho Books.
Whether you’re new to the software or need a refresher, this post will help. You’ll learn the steps to enter products, set stock levels, and more. Let’s get started and simplify your inventory process.
Introduction To Zoho Books
Welcome to the world of Zoho Books, a powerful tool designed to simplify your accounting tasks. If you’ve ever felt overwhelmed by managing finances, Zoho Books might just be the answer you’ve been looking for. In this post, we’ll explore how to add inventory in Zoho Books, but first, let’s understand what Zoho Books is and why it’s beneficial for your business.
What Is Zoho Books?
Zoho Books is an online accounting software that helps you manage your business finances. Think of it as your financial assistant, but without the coffee breaks. It offers a user-friendly interface where you can handle invoices, expenses, and most importantly for this post, inventory management. With Zoho Books, you can keep track of your sales, purchases, and even get detailed reports. It’s like having a mini accountant right at your fingertips!
Benefits Of Using Zoho Books
Now, you might be wondering, “Why should I use Zoho Books?” Well, let me break it down for you:
- Ease of Use: No need to be a tech wizard. Zoho Books is designed to be intuitive.
- Cloud-Based: Access your financial data from anywhere, anytime. Your accountant can’t say the same!
- Automation: Say goodbye to manual entries. Zoho Books automates repetitive tasks.
- Detailed Reports: Get insights into your business with comprehensive reports.
Personally, I find the automation feature to be a lifesaver. Imagine not having to enter every transaction manually – that’s what Zoho Books does for you. It’s like having an extra pair of hands without the added payroll.
So, are you ready to dive into adding inventory in Zoho Books? Let’s get started!

Credit: www.youtube.com
Setting Up Your Zoho Books Account
Easily manage your stock with Zoho Books. Add inventory items by navigating to the “Items” section. Fill in details like name, SKU, and quantity.
Setting up your Zoho Books account is the first step to managing your inventory. This section will guide you through the process. We will cover account creation and initial configuration.Account Creation
To start, visit the Zoho Books website. Click on the “Sign Up” button. Fill in your details such as name, email, and password. Click “Create Account”. Check your email for a verification link. Click the link to verify your account. You now have a Zoho Books account.Initial Configuration
Once your account is created, log in. You will see a setup wizard. Follow the prompts to set up your business details. Enter your company name, address, and contact information. Select your business type. Choose your currency and time zone. Next, you will set up your financial year. This is important for accurate reporting. Select the start month of your financial year. Save your settings. You are now ready to add your inventory. Ensure your tax settings are correct. This will help with accurate invoicing. Go to the “Settings” tab. Select “Taxes”. Add your tax rates. Save your settings. Your Zoho Books account is now set up. You can now add inventory and start managing your business. “`Navigating The Dashboard
Access the dashboard and select ‘Items’ to add inventory in Zoho Books. Click ‘New Item,’ fill in details, and save. Manage stock levels effortlessly.
Navigating the Dashboard in Zoho Books is crucial for managing your inventory. The dashboard provides a snapshot of your business activities and financial health. Knowing how to find your way around can save time and effort.Dashboard Overview
The dashboard is your starting point in Zoho Books. It shows key metrics. You’ll see charts and graphs displaying your financial data. This overview helps you stay informed about your business performance.Key Features
The dashboard includes several useful features. The “Sales” section displays your total sales and overdue invoices. The “Expenses” section shows your spending patterns. This helps you track where your money goes. Another feature is the “Receivables” section. It lists unpaid invoices and payment statuses. This is essential for managing cash flow. The “Payables” section works similarly but tracks your bills. Keeping an eye on these sections helps you stay on top of payments. The dashboard also has shortcuts. These are quick links to common tasks. You can add a new invoice, bill, or expense with one click. This saves time and reduces the steps needed for regular tasks. In summary, the dashboard in Zoho Books is a powerful tool. It provides an at-a-glance view of your business. Understanding its layout and features helps you manage your inventory effectively.Accessing The Inventory Module
Accessing the Inventory Module in Zoho Books is straightforward. This module helps businesses manage their stock efficiently. Follow these steps to get started with inventory management.
Finding The Inventory Section
First, log in to your Zoho Books account. On the left sidebar, find the “Items” tab. Click on it to access the Inventory section. This section is where you can add, edit, and manage your inventory items. It’s essential to familiarize yourself with this location for easy navigation.
Understanding Inventory Features
The Inventory module in Zoho Books offers many features. You can add new items and categorize them for better management. Track item quantities and set reorder levels to avoid stockouts. The module also allows you to create item groups for similar products.
Another feature is the ability to set different selling prices for each item. This helps in managing sales promotions and discounts. You can also track the movement of items with detailed history logs.
Overall, the Inventory module in Zoho Books is designed to simplify your stock management. It ensures you have all the necessary tools to keep track of your inventory efficiently.
Adding A New Item
Adding a new item to your inventory in Zoho Books is simple. This process helps you keep your stock updated. It ensures that you have the right items available for your customers. Let’s dive into the steps you need to follow.
Entering Item Details
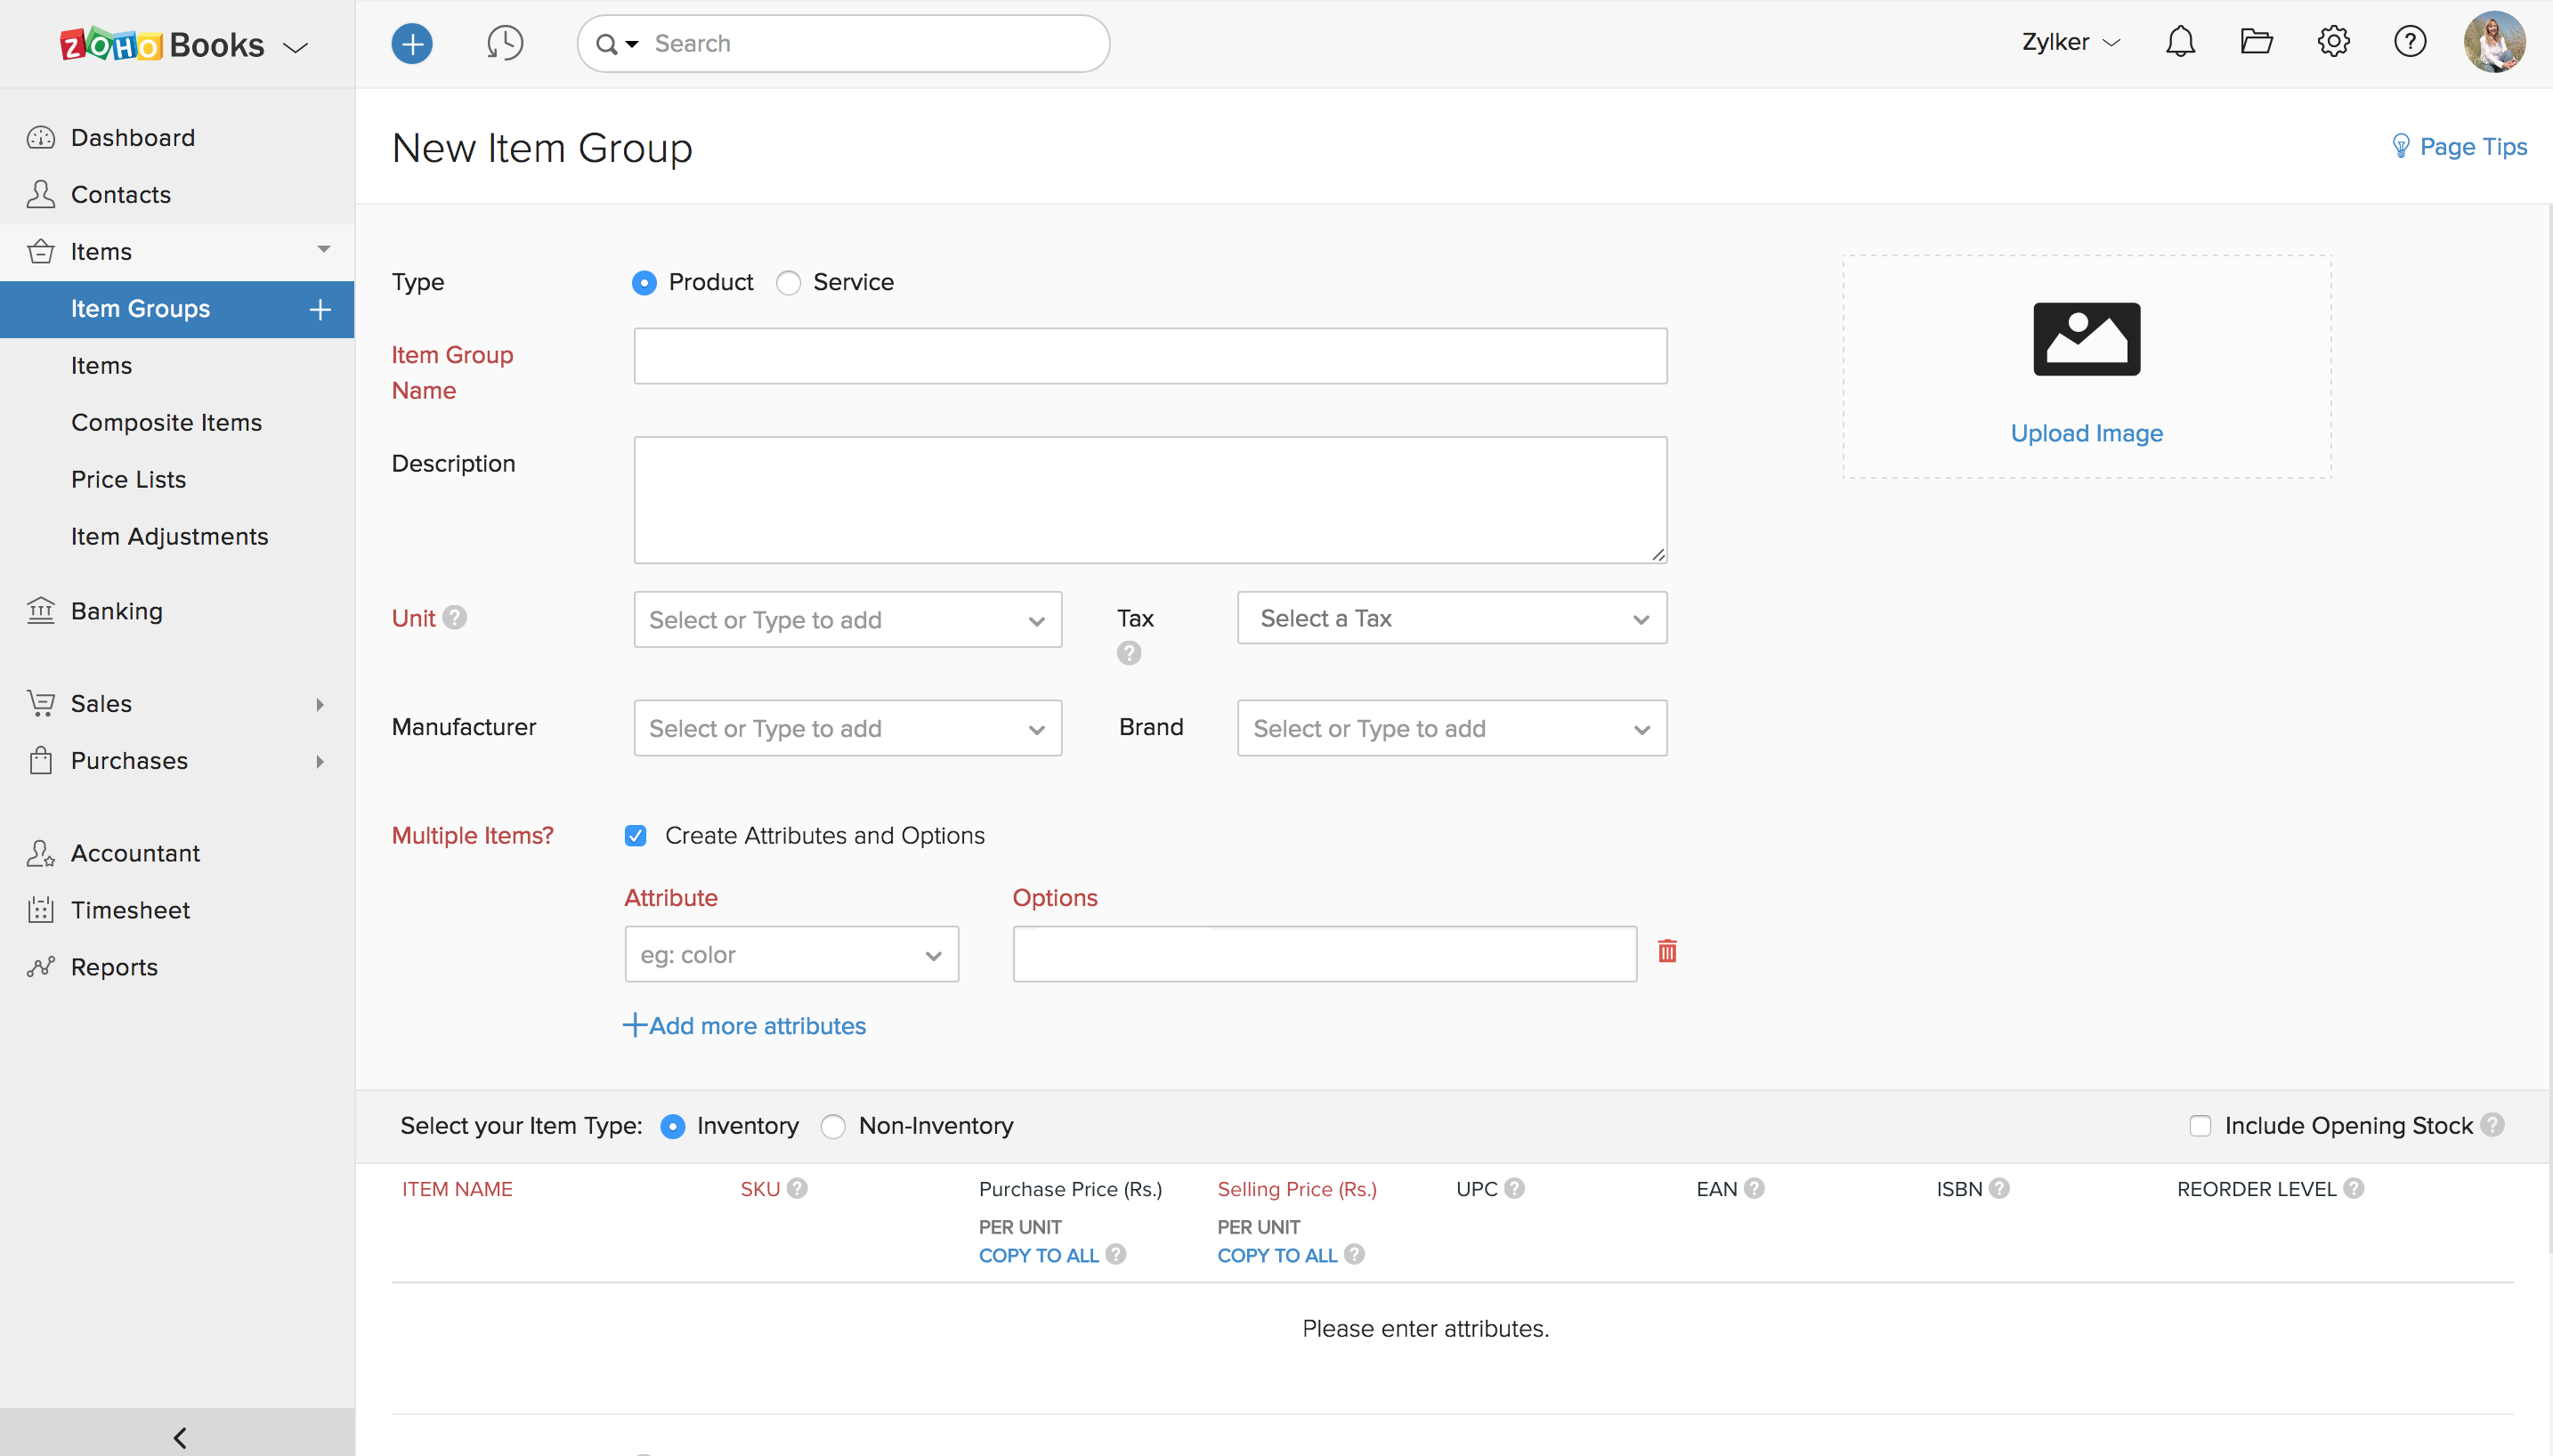
First, open Zoho Books and go to the “Items” section. Click on the “New Item” button. A form will appear where you need to enter details about the item. Start with the item name. Make sure it is clear and descriptive.
Next, fill in the item code. This code helps you track the item easily. You can create your own code or use a standard one. After that, select the unit of measurement. This could be pieces, kilograms, or any other unit you use.
Describe the item briefly. This description will help you and your team understand what the item is. It is also useful for your customers if they can see it.
Setting Up Pricing
Now, set up the pricing for the item. Enter the selling price. This is the price at which you will sell the item to your customers. Make sure the price is competitive and fair.
Next, enter the cost price. This is the price you pay to get the item. It helps you understand your profit margins. If there are any discounts, you can add them here.
Finally, review all the details you have entered. Ensure everything is correct. Once done, click “Save” to add the new item to your inventory. Your item is now part of Zoho Books, ready to be managed and sold.
Managing Inventory Categories
Organizing your inventory is crucial for smooth business operations. In Zoho Books, managing inventory categories helps you keep track of your products and makes it easier to find items when you need them. Let’s dive into the process of creating and assigning categories to your inventory.
Creating Categories
Creating categories in Zoho Books is like sorting your items into different shelves. Here’s how you do it:
- Navigate to the Items module from the sidebar.
- Click on the Categories tab.
- Hit the + New Category button.
- Fill in the Category Name and a brief Description.
- Click Save to create the category.
Voila! You’ve just created a new category. Simple, right? This will make your life much easier when you have hundreds of items to manage.
Assigning Items To Categories
Now that you have categories, it’s time to put items into them. Imagine it like grouping your groceries; you wouldn’t want to mix veggies with detergents, would you?
- Go to the Items module again.
- Select an item from your inventory list.
- Click on the Edit button.
- In the Category dropdown menu, select the category you created.
- Hit Save to update the item.
Easy-peasy! Now your item is neatly categorized, making it simpler for you to find and manage it. Trust me, your future self will thank you for this.
| Step | Action |
|---|---|
| 1 | Navigate to Items module. |
| 2 | Click Categories tab. |
| 3 | Hit + New Category. |
| 4 | Fill in Category Name and Description. |
| 5 | Click Save. |
And there you have it, folks! Managing inventory categories in Zoho Books is as straightforward as organizing your closet. By taking these steps, you ensure that your inventory is always in order, making it easier to manage and more efficient to operate your business. Happy organizing!
Tracking Stock Levels
Efficient stock level tracking is crucial for any business using Zoho Books. Keeping accurate records helps avoid stockouts and overstocking. Zoho Books offers two methods to manage stock levels: manual updating and automated tracking. Both methods ensure you maintain an organized inventory system.
Updating Stock Manually
Manually updating stock levels in Zoho Books is straightforward. Navigate to the “Items” module on the dashboard. Select the item you wish to update. Enter the new stock quantity in the “Stock on Hand” field. Save the changes. This method is quick for small adjustments.
For bulk updates, use the import feature. Download the sample CSV file. Fill in the required fields with the updated stock information. Upload the completed CSV file back into Zoho Books. This updates multiple items at once, saving time.
Automating Stock Tracking
Automating stock tracking in Zoho Books streamlines inventory management. Integrate Zoho Books with your e-commerce platform. The system automatically adjusts stock levels after each sale. This reduces manual entry errors.
Set up reorder levels to receive notifications. Zoho Books alerts you when stock falls below the set threshold. This ensures you restock items before running out. Automation keeps your inventory accurate and up-to-date with minimal effort.
Generating Inventory Reports
Generating inventory reports in Zoho Books helps you manage your stock efficiently. These reports offer insights into your inventory levels, sales trends, and stock movements. Understanding these reports can help you make informed business decisions.
Types Of Reports
Zoho Books provides various inventory reports. Each serves a different purpose. Common types include:
- Stock Summary Report: Shows current stock levels and value.
- Inventory Valuation Report: Displays the value of your stock over time.
- Sales Report: Lists items sold within a specific period.
- Purchase Report: Details purchased items and their quantities.
These reports give a comprehensive view of your inventory.
Customizing Reports
Customizing reports in Zoho Books helps you get specific information. You can adjust parameters to suit your needs. Choose date ranges, filter by item categories, or focus on specific vendors.
Use these options to generate tailored reports. This makes it easier to track your inventory and identify trends. It also helps in identifying areas needing attention.
Integrating With Other Modules
Integrating your inventory with other modules in Zoho Books is like connecting the dots to see the full picture. It’s essential for smooth operations and accurate data. By linking your inventory with sales, purchases, and accounting, you ensure that every transaction is tracked, and nothing falls through the cracks. Let’s dive into how you can do this.
Linking Sales And Purchases
When you link your inventory with the sales and purchase modules, you’re creating a seamless flow of information. Here’s why it’s important:
- Real-time Updates: Whenever a sale is made, your inventory levels are automatically updated. No more manual entries!
- Accurate Stock Levels: By linking purchases, you ensure that stock additions are reflected immediately. This helps you avoid stockouts or overstocking.
- Streamlined Processes: Integrated modules mean fewer steps and reduced chances of errors. It’s efficiency at its best.
To link sales and purchases with your inventory in Zoho Books:
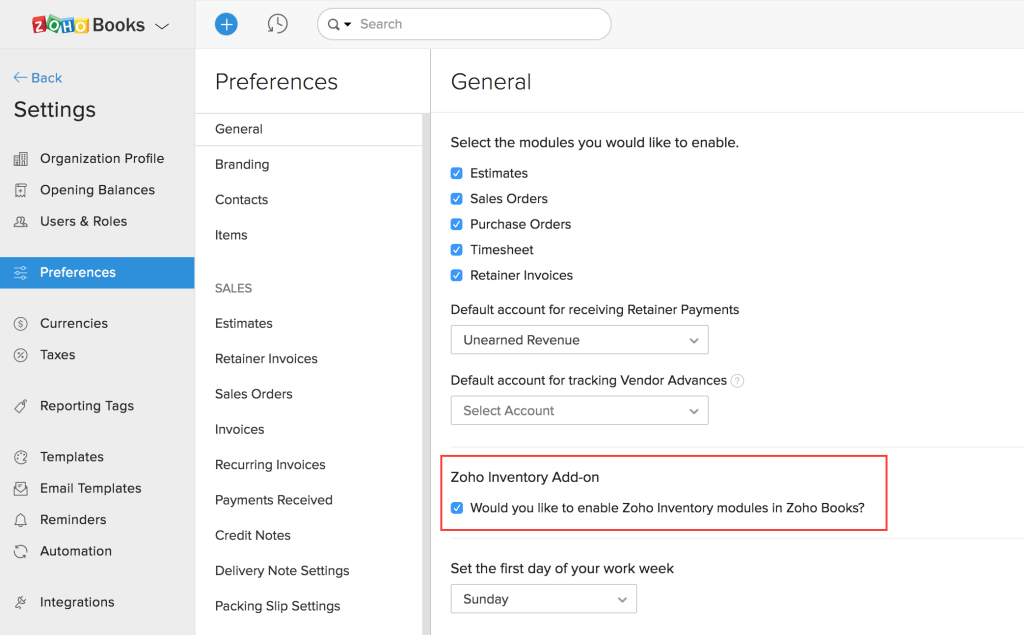
- Go to the Settings in Zoho Books.
- Select Preferences and then click on Items.
- Enable the options for tracking inventory for sales and purchases.
- Save your settings, and you’re good to go!
Syncing With Accounting
Syncing your inventory with the accounting module is crucial for financial accuracy. Here’s how it helps:
- Cost Tracking: Keep track of the cost of goods sold (COGS) accurately. This helps in better financial reporting and analysis.
- Profit Margins: Understand your profit margins by having a clear view of inventory costs versus sales revenue.
- Compliance: Ensure compliance with accounting standards by maintaining accurate inventory records.
To sync inventory with accounting:
- Navigate to the Settings in Zoho Books.
- Click on Integrations and choose Accounting.
- Enable the inventory sync option.
- Map your inventory accounts to the respective accounts in your chart of accounts.
- Save your settings, and now your inventory data will flow directly into your accounting module.
By integrating these modules, you streamline operations, reduce errors, and have a clearer view of your business’s financial health. Plus, it makes your life a whole lot easier. Who wouldn’t want that?

Credit: woocommerce.com
Tips For Efficient Inventory Management
Managing inventory can feel like juggling balls in the air. One slip, and everything crashes down. But don’t worry, with a few tips and best practices, you can manage your inventory like a pro, especially when using Zoho Books. Let’s dive into some ways to keep your inventory organized and efficient.
Best Practices
When it comes to managing inventory in Zoho Books, following best practices can save you time and headaches. Here are some tips:
- Regular Updates: Make sure to update your inventory levels regularly. This helps in avoiding stockouts or overstock situations.
- Accurate Data Entry: Always double-check the data you enter. Mistakes in quantity or pricing can lead to financial discrepancies.
- Use Categories: Organize your inventory into categories. It makes tracking and managing items easier.
- Set Reorder Points: Use reorder points to know when to restock items. Zoho Books can help automate this process.
Common Mistakes To Avoid
Even the best of us can trip up sometimes. Here are some common mistakes to watch out for:
- Neglecting Regular Audits: Skipping regular inventory checks can result in unnoticed discrepancies.
- Overcomplicating Systems: While categories and detailed records are good, overcomplicating your system can make it hard to manage. Keep it simple.
- Ignoring Software Updates: Zoho Books frequently updates to improve features. Ignoring these updates can mean missing out on useful tools.
- Not Training Staff: Ensure all staff handling inventory are well-trained in using Zoho Books. This avoids errors and keeps things running smoothly.
Remember, managing inventory is like cooking a meal. Too much or too little of an ingredient can ruin the dish. Follow these tips, and you’ll keep your inventory in perfect balance.
Credit: www.zoho.com
Frequently Asked Questions
How Do I Add Inventory To Zoho Books?
Go to the “Items” tab in Zoho Books. Click “New Item. ” Fill in the details and click “Save. “
How To Create A Stock Item In Zoho Books?
To create a stock item in Zoho Books, navigate to the Items module. Click on “+ New Item”. Enter item details, select “Stock”. Save the item.
How To Add Quantity In Zoho Books?
Go to Items module in Zoho Books. Select the item you want to update. Click Edit. Adjust the quantity and save.
How To Set Up Inventory?
To set up inventory, identify and categorize items. Use inventory management software to track stock levels, reorder points, and sales. Regularly update records and perform audits. Implement barcode systems for efficient tracking. Train staff on inventory procedures to ensure accuracy and consistency.
How To Add New Inventory Items In Zoho Books?
To add new inventory items in Zoho Books, navigate to the Items section, then click on “New Item. “
Conclusion
Adding inventory in Zoho Books is straightforward and efficient. This guide simplifies the process. Your inventory will be organized and easily accessible. Accurate records enhance business operations. Follow these steps for smooth inventory management. Zoho Books offers tools to streamline tasks.
Regular updates ensure your data remains current. Proper inventory management boosts productivity. Take control of your inventory with Zoho Books. Your business benefits from precise tracking. Enjoy hassle-free inventory handling. Get started today and optimize your operations.