Setting up NordVPN on an Omada Router enhances your online security. It ensures your internet connection is private and secure.
In today’s digital age, privacy is crucial. Many users want to secure their internet activities. NordVPN offers top-notch security features, and installing it on your Omada Router can protect all devices on your network. This means you don’t need to install VPN software on each device.
With a secure router setup, you can browse safely and keep your data private. This guide will walk you through the steps to install NordVPN on your Omada Router. It’s easier than you think, and the peace of mind is worth it. Let’s get started on making your internet connection safer.

Credit: www.tp-link.com
Introduction To Nordvpn And Omada Router
NordVPN offers robust online security, while the Omada Router ensures reliable internet connectivity. Installing NordVPN on an Omada Router enhances privacy and secures your network.
NordVPN is a popular VPN service. It helps protect your online privacy. It secures your internet connection. Omada Router is a high-quality network device. It manages and optimizes your internet usage.Combining NordVPN with an Omada Router offers many benefits. You get enhanced security and better network management. This guide will help you install NordVPN on your Omada Router.Benefits Of Using Nordvpn
NordVPN encrypts your internet traffic. This keeps your data safe from hackers. It also hides your IP address. This allows you to browse anonymously.NordVPN has servers in many countries. This means you can access content from anywhere. It also improves your online experience by reducing buffering and lag.Overview Of Omada Router
Omada Router is known for its reliability. It offers high-speed internet access. It also provides advanced security features.The router is easy to set up. It supports multiple devices. This makes it perfect for both home and office use.Omada Router also has a user-friendly interface. This makes network management simple. You can easily monitor and control your internet usage. “`Preparing For Installation
Installing NordVPN on an Omada Router requires some preparation. Proper setup ensures a smooth installation process. This section covers essential steps before installing NordVPN on your Omada Router.
Prerequisites And Requirements
Make sure you have the necessary equipment. You’ll need an Omada Router and a NordVPN subscription. Ensure your router is compatible with VPN services. Check the manufacturer’s website for compatibility details. Have your NordVPN login credentials ready.
Setting Up Your Omada Router
Begin by connecting your Omada Router to your modem. Use an Ethernet cable for a stable connection. Power on your router and ensure it’s functioning correctly. Access the router’s interface through your computer.
Next, configure your network settings. Navigate to the settings menu on your router’s interface. Ensure your internet connection is active. Update the firmware if necessary. This ensures the router operates efficiently.
Finally, save all changes. Restart your router. Confirm that all settings are applied correctly. Your Omada Router is now ready for the NordVPN installation.
Installing Nordvpn On Omada Router
So, you’ve decided to boost your online security and privacy by installing NordVPN on your Omada Router? Good choice! This guide will walk you through the steps. Don’t worry if you’re not tech-savvy; we’ll keep it simple and straightforward. Ready? Let’s dive in!
Accessing The Router Interface
First things first, you need to access your Omada router’s interface. Think of it as the control room where all the magic happens. Here’s how you can do it:
- Make sure your computer is connected to the Omada router. You can do this via Wi-Fi or an Ethernet cable.
- Open your web browser and type in the router’s IP address. Usually, it’s something like
192.168.0.1or192.168.1.1. If you’re unsure, check the router’s manual or the label on the device. - Enter your username and password. By default, these are often “admin” and “admin” unless you’ve changed them.
And voila! You should now be inside the router’s interface. If you’re seeing a lot of buttons and options, don’t panic. We’ll guide you through what you need to do next.
Configuring Vpn Settings
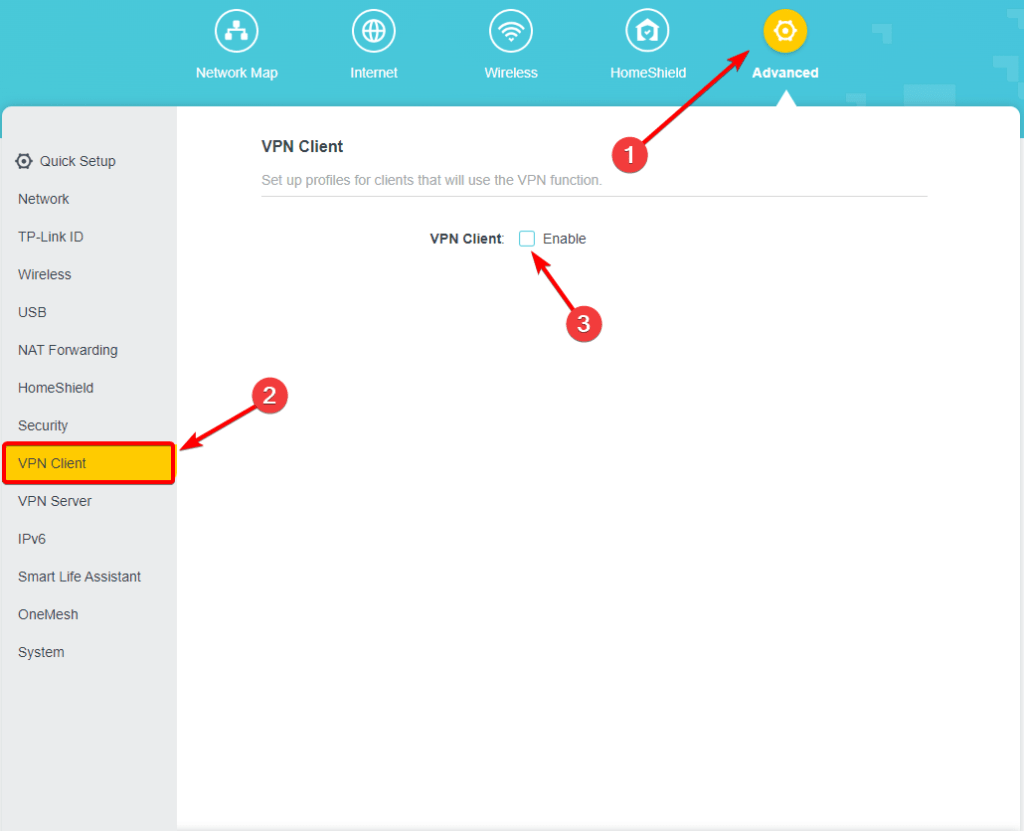
Now that you’re in, it’s time to configure the VPN settings. This is where we set up NordVPN to work with your Omada router. Follow these steps:
- In the router interface, look for a section labeled VPN or VPN Client. Click on it.
- Here, you’ll need to enter your NordVPN details. You’ll find these details in your NordVPN account under the section for manual setup.
- Enter the server address, your NordVPN username, and password. Make sure to select the VPN protocol (usually OpenVPN) as per NordVPN’s recommendations.
- Upload the necessary configuration files (like .ovpn files) provided by NordVPN. These files contain all the settings needed for the VPN to work correctly.
- Save the settings and enable the VPN connection.
It’s like baking a cake – follow the recipe, and soon you’ll have a deliciously secure internet connection. If everything is set up correctly, your router will now connect to NordVPN automatically.
And there you have it! You’ve just installed NordVPN on your Omada router. Not only are you now more secure online, but you’ve also learned a bit more about how your router works. Happy surfing!

Credit: support.nordvpn.com
Testing Your Vpn Connection
After setting up NordVPN on your Omada Router, testing your VPN connection is crucial. This ensures your internet traffic is secure. It also confirms that the VPN is working properly. Let’s walk through some simple steps to verify and troubleshoot your VPN connection.
Verifying Vpn Status
First, check the VPN status on your Omada Router. Log into your router’s web interface. Navigate to the VPN section. Confirm that the VPN is connected. Look for any status indicators showing ‘Connected’ or similar. If your VPN has a specific dashboard, it should show active status.
Next, verify your IP address. Open a web browser and search “What is my IP?” Compare this IP address to your original one. If they differ, your VPN is working. This means your internet traffic is now secure and routed through the VPN.
Troubleshooting Common Issues
Sometimes, the VPN connection may not work as expected. Start by checking your router’s firmware. Ensure it is up to date. Outdated firmware can cause connection problems. Update it if necessary.
If the VPN still doesn’t work, restart your router. A simple reboot can often fix connectivity issues. Also, check your VPN account credentials. Incorrect login details can prevent a successful connection.
Another step is to check your internet connection. Ensure you have a stable connection. Fluctuations in your internet can affect the VPN performance. Finally, consult the NordVPN support page. They offer solutions for common issues. Following these steps should help you maintain a strong VPN connection.
Enhancing Network Security
Enhancing network security is crucial in today’s digital age. Installing NordVPN on your Omada Router can significantly boost your network’s protection. VPNs encrypt your data, keeping it safe from prying eyes. This prevents unauthorized access and protects your personal information. NordVPN offers strong encryption, ensuring a secure connection for all devices on your network.
Additional Security Tips
Use strong, unique passwords for your router and VPN account. Change them regularly. Enable two-factor authentication for an extra layer of security. Keep your router’s firmware up-to-date to protect against vulnerabilities. Disable remote management features unless necessary. Limit access to your router’s settings to trusted individuals only.
Maintaining And Updating Your Vpn
Regularly update NordVPN to the latest version. This ensures you benefit from the latest security patches and features. Periodically check your VPN settings to ensure they are optimized for security. Monitor your VPN connection to ensure it remains stable and secure. If you encounter issues, consult NordVPN support for assistance.

Credit: community.tp-link.com
Frequently Asked Questions
Can Nordvpn Be Installed On A Tp-link Router?
Yes, you can install NordVPN on a TP-Link router. Follow the setup guide provided by NordVPN on their website.
How Do I Add Nordvpn To My Router?
To add NordVPN to your router, access your router’s settings. Enter NordVPN’s server details. Save changes and reboot.
How To Install A Vpn On A Tp-link Router?
Access your TP-Link router’s web interface. Navigate to the “VPN” section. Choose “PPTP” or “OpenVPN”. Enter your VPN server details. Save and reboot the router.
Does Nordvpn Use Openvpn Or Wireguard?
NordVPN uses both OpenVPN and WireGuard protocols. Users can choose between these two secure options for their VPN connection.
How Do I Install Nordvpn On Omada Router?
You need to configure the router with NordVPN settings. Follow the NordVPN guide step-by-step.
Conclusion
Installing NordVPN on your Omada router enhances security. It protects your network from threats. The process is straightforward and quick. Follow the steps to set it up easily. Once installed, enjoy safer browsing. Your data stays private and secure. No more worries about online privacy.
NordVPN ensures a safer internet experience. Keep your information protected. Follow the guide and secure your network today. Happy browsing!