Creating a landing page in ConvertKit is simple and effective. This guide will show you how to do it step-by-step.
A landing page is crucial for capturing leads and growing your email list. ConvertKit offers an easy-to-use platform for building these pages. You don’t need any coding skills. Just follow a few straightforward steps. In this blog post, you will learn how to create a landing page in ConvertKit.
We’ll cover everything from selecting a template to customizing your page. By the end, you will have a functional landing page ready to attract new subscribers. Let’s dive in and get started!
Introduction To Convertkit Landing Pages
Creating a landing page can feel like a daunting task, especially if you’re new to the world of digital marketing. But fear not! Convertkit makes this process incredibly simple and straightforward. Whether you’re looking to collect emails, promote a product, or share your latest blog post, Convertkit’s landing pages are designed to help you achieve your goals with ease.
Benefits Of Using Convertkit
Using Convertkit for your landing pages comes with a multitude of benefits. Here are a few reasons why Convertkit stands out:
- Ease of Use: Convertkit is designed with simplicity in mind. You don’t need to be a tech wizard to create beautiful and functional landing pages.
- Integration: Convertkit integrates seamlessly with various tools and platforms, making it easier to manage your marketing efforts.
- Customization: With Convertkit, you can easily customize your landing pages to match your brand’s look and feel.
- Analytics: Track the performance of your landing pages with detailed analytics, helping you understand what’s working and what needs improvement.
Key Features To Leverage
Convertkit offers a range of features that can help you create effective landing pages. Here are some key features to take advantage of:
- Templates: Choose from a variety of pre-designed templates that can be easily customized to suit your needs. No design skills required!
- Drag-and-Drop Editor: The intuitive drag-and-drop editor makes it easy to add and arrange elements on your landing page.
- Forms and Tags: Use forms and tags to segment your audience and deliver personalized content.
- A/B Testing: Test different versions of your landing page to see which one performs better. This feature can help you optimize your pages for maximum conversions.
- Mobile Optimization: Ensure your landing pages look great on all devices, including smartphones and tablets.
In conclusion, Convertkit offers a user-friendly solution for creating professional landing pages. With its range of customizable templates, intuitive drag-and-drop editor, and powerful analytics, you can create landing pages that not only look great but also drive results. So why not give Convertkit a try and see how it can help you achieve your marketing goals?
Setting Up Your Convertkit Account
Setting up your Convertkit account is the first step to creating a successful landing page. Convertkit makes it easy to collect emails and engage with your audience. This guide will walk you through the initial setup process. Let’s get started!
Creating Your Account
First, visit the Convertkit website. Click on the “Sign Up” button. Enter your name and email address. Create a strong password. Click “Get Started”. Confirm your email address through the link sent to your inbox. You now have a Convertkit account.
Navigating The Dashboard
Once logged in, you’ll see the Convertkit dashboard. It is user-friendly and easy to navigate. The dashboard has several sections, including Subscribers, Broadcasts, Sequences, and Automations. Each section helps manage different aspects of your email marketing.
On the left side, you’ll find the main menu. This menu allows you to access various tools and features. Hover over each item to see a brief description. This helps you understand what each tool does. Spend a few minutes exploring the dashboard to get familiar with it.
Creating a landing page in Convertkit is simple once you set up your account and navigate the dashboard. Follow these steps, and you’ll be on your way to capturing leads and growing your audience.
Designing Your Landing Page
Designing your landing page in ConvertKit is an exciting process. A well-designed landing page can attract visitors and convert them into subscribers. This section will guide you through the essential steps to create an eye-catching and effective landing page.
Choosing A Template
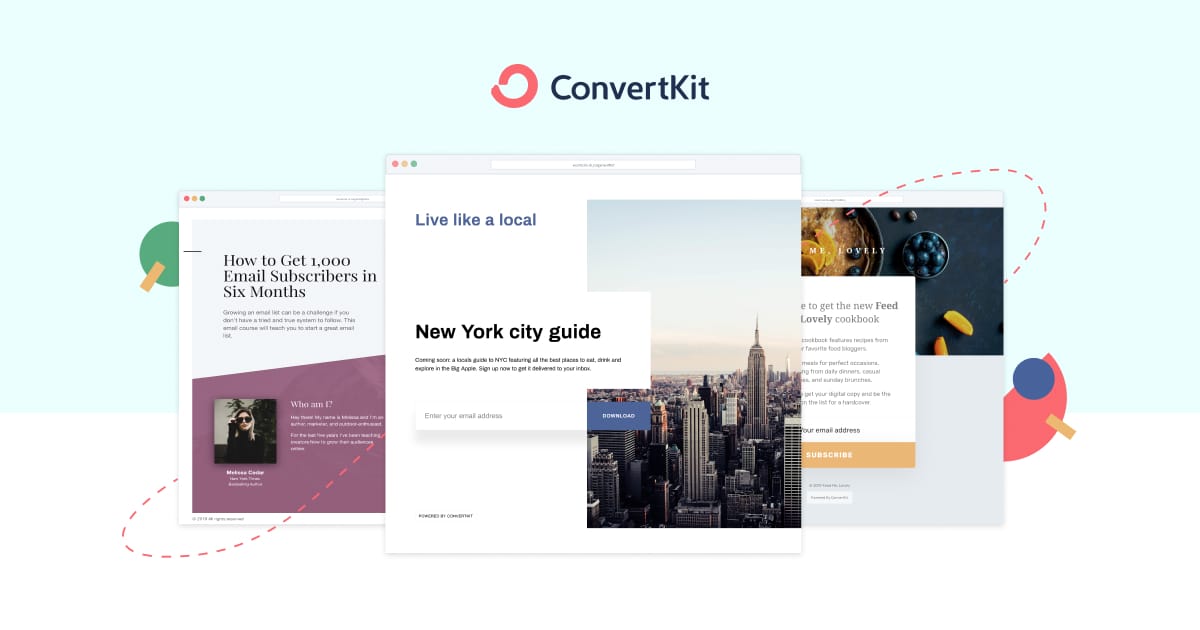
Start by choosing a template that fits your goals. ConvertKit offers a variety of templates. Each one is designed to cater to different needs. Whether you want a simple layout or something more detailed, there is a template for you. Browse through the options and pick one that matches your brand’s style.
Customizing The Layout
Once you have chosen a template, it’s time to customize the layout. You can change the text, images, and colors. Make sure the design reflects your brand. Keep it simple and clean. This helps in keeping the visitors’ attention focused. Add your logo for a personal touch. Use high-quality images related to your content.
Adjust the text to be clear and concise. Include a strong headline that grabs attention. Your call-to-action should be noticeable and compelling. This guides visitors on what to do next. Customize the buttons and forms to match your brand colors. Ensure that the layout looks good on both desktop and mobile devices.

Credit: www.youtube.com
Adding Content And Media
Adding content and media to your landing page in ConvertKit can make it more engaging. You can attract more visitors with the right mix of text, images, videos, and forms. These elements make your landing page informative and appealing.
Incorporating Text And Images
Start by adding a catchy headline. This grabs attention and makes visitors want to read more. Use clear and concise language. Break your text into small sections. This makes it easier to read. Use bullet points or numbered lists for key points.
Images make your landing page more visually appealing. Use high-quality images that relate to your content. Avoid using too many images, as this can slow down your page. Place images near relevant text to enhance understanding.
Embedding Videos And Forms
Videos can explain complex ideas easily. They can also keep visitors on your page longer. Use a short, engaging video. Embed it in a prominent spot on your landing page. Make sure the video loads quickly.
Forms are essential for collecting visitor information. Place forms where they are easily visible. Keep them simple. Ask for basic information only. This increases the chances of visitors filling them out. Use a clear call-to-action button to guide visitors.
By effectively adding content and media, your ConvertKit landing page can convert more visitors into subscribers.
Finalizing And Publishing
Creating a landing page in ConvertKit is a rewarding experience, but there’s one crucial step left: finalizing and publishing your page. This stage ensures that everything looks perfect and functions as intended. Let’s dive into the essentials of previewing, testing, and finally publishing your landing page.
Preview And Test
Before you hit the publish button, it’s vital to preview and test your landing page. Think of this as your dress rehearsal. Here’s how you can do it:
- Preview Your Page: ConvertKit provides a handy preview option. Click on the preview button to see how your page looks on different devices. This ensures your design is responsive and looks good on both desktops and mobiles.
- Test All Links: Double-check that all the links on your page are working correctly. You don’t want your visitors to click on a broken link.
- Review Form Functionality: Make sure your forms are working and that you are capturing the data correctly. Try submitting a test form to see if you receive the information as expected.
- Check for Typos: Give your page a thorough read to catch any typos or grammatical errors. It’s always a good idea to ask a friend to review it as well.
Testing your landing page ensures that your visitors have a seamless experience. After all, first impressions matter, right?
Publishing Your Page
Once you are satisfied with your preview and tests, it’s time to publish your page. Here’s a simple step-by-step process:
- Click Publish: In ConvertKit, you’ll find the publish button at the top right corner of the editor. Click it to proceed.
- Set Your URL: Choose a custom URL for your landing page. Make it simple and relevant to your content. For example, if your page is about a new ebook, you could use something like
www.yoursite.com/ebook. - SEO Settings: Don’t forget to optimize your page for search engines. Add a meta title and description that include your main keywords. This will help your page rank better in search results.
- Social Sharing: Customize the image, title, and description that will appear when your page is shared on social media. This can increase the chances of your page being clicked on and shared.
- Publish: Hit the final publish button. Your landing page is now live and ready to receive visitors!
Publishing your page is a thrilling moment. It’s like opening the doors to a brand-new store. You’ve put in the hard work, and now it’s time to share it with the world. Remember, the more you promote your landing page, the more traffic you’ll get.
So, there you have it! With ConvertKit, finalizing and publishing your landing page is a breeze. Now go ahead and create something amazing!

Credit: kit.com

Credit: www.convertflow.com
Frequently Asked Questions
Can You Make A Landing Page On Convertkit?
Yes, you can create a landing page on ConvertKit. It offers customizable templates and user-friendly tools.
Is Convertkit Landing Page Free?
Yes, ConvertKit offers free landing pages. Users can create unlimited landing pages at no cost.
How Do I Create My Own Landing Page?
To create your own landing page, use a website builder or CMS. Choose a template, customize content, and add visuals. Optimize for SEO. Publish and promote.
How To Create A Landing Page In Kit?
To create a landing page in Kit, first log into your account. Select “Create New Page” from the dashboard. Choose a template, customize it with your content, images, and branding. Finally, save and publish your landing page.
What Is A Landing Page In Convertkit?
A landing page is a standalone web page designed to capture leads or promote a product.
Conclusion
Creating a landing page in Convertkit is straightforward and user-friendly. Follow the steps outlined, and you will have a professional page in no time. Remember to keep your design simple and your message clear. Test different elements to find what works best.
With these tips, you can build effective landing pages that convert visitors into subscribers. Happy creating!


